
August 08, 2023
Setting up a new Raspberry Pi Board can be daunting without a monitor and keyboard, Once you flash a new image of the Operating System – Raspberry Pi OS or similar, the next obvious step is to boot the Pi, log in to it and access the terminal over SSH. But for a headless setup, i.e. without a Monitor and Keyboard, it’s not that straightforward. The same goes if you’re using a lite image of the OS (without a Desktop Environment). For SSH to work, you first need to get your board on your home network, even if you manage to create an ad-hoc network between your Pi and workstation, the SSH is disabled for security reasons.
Are you ready to influence the tech landscape too? Take part in the Developer Nation survey and be a catalyst for change. Your thoughts matter, and you could be the lucky recipient of our weekly swag and prizes! Start Here
There are two simple ways to sort this out, and we’ll look into it one-by-one
#1 The Simple Way: Using the official Raspberry Pi Imager,
Raspberry Pi’s official flashing utility can be downloaded from here . This tool allows you to pick the OS image you want to flash. It also has a setting page where you can enable SSH and add credentials of your home router WiFi SSID and password. All this information is baked into the OS image during the SD card flashing process.

#2 The Ninja Way: Underneath the hood
While the Raspberry Pi Imager way works pretty straightforward, for the ninja user, it’s important to understand how this all works underneath the hood. So the job of the flasher programmer is to partition your SD card into two segments – BOOT and the Root File System (rootfs) of the raspberry pi. This is how typical how Linux distributions are stored.
The boot partition holds all the essential files used during the booting process, including the bootloader, and the rootfs partition holds the primary filesystem of the Linux operating system. Now let’s add settings for our WiFi connection and enable SSH on the raspberry pi board the ninja way.
Once you flashed a new operating system, the SD card shall be auto-ejected, so re-insert the SD card, and you shall see a partition named BOOT mounted on your system. Create a new file in the root folder of the boot partition with the exact name – wpa_supplicant.conf. In this file add following using your favourite text editor or terminal:
“` code-block
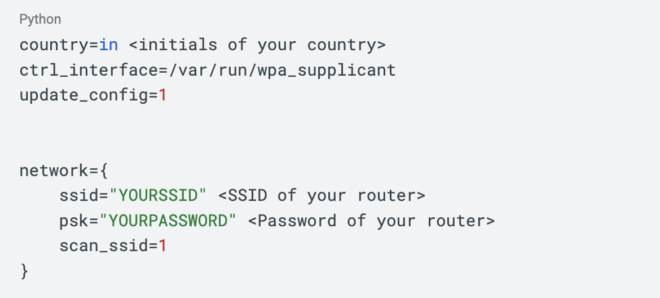
This information shall be used by “wpa_supplicant”, a utility used by Linux distributions like Debian to connect to wifi networks. After the boot is complete, it’ll scan for WiFi networks nearby and connect to your SSID and password you supplied.
Don’t worry about supplying your password in plain text, after the boot, this file will be removed automatically.
Now to enable SSH, which is disabled by default for security, just create a new empty file with the name ssh in the root directory of the boot partition. Use the terminal command to create this file

And that’s it, your raspberry pi will be connected to your WiFi network and ready to accept incoming SSH connection requests, and all this is done without ever connecting your board to a monitor and keyboard – Headless.
Test your SSH connection from your workstation open the terminal, and type:

and you shall be logged in.
Found this tutorial interesting? Read more about the latest trends in Embedded System development in our previous blog here and take your embedded projects to IoT using MQTT via this blog here .
Recent Posts


August 27, 2025
How to Find the Right Learning Path When You’re Switching to a Tech Career
See post


August 27, 2025
The Hidden Challenges in Software Development Projects: Key Insights from Our Latest Survey
See post


August 22, 2025
Developer News This Week: AI Speed Trap, GitHub Copilot Agents, iOS 26 Beta Updates & More (Aug 22, 2025)
See post