
September 01, 2022
Software development is a messy and intensive process, which in theory, should be a linear, cumulative construction of functionalities and improvements in code, but is rather more complex. More often than not it is a series of intertwined, non-linear threads of complex code, partly finished features, old legacy methods, collections of TODO comments, and other things common to any human-driven and a largely hand-crafted process known to mankind.
Git was built to make our lives easier when dealing with this messy and complex approach to software development. Git made it possible to work effortlessly on many features at once and decide what you want to stage and commit to the repository. The staging area in Git is the main working area, but most of the developers know only a little about it.
In this article, we will be discussing the staging area in Git and how it is a fundamental part of version control and can be used effectively to make version control easier and uncomplicated.
What is Staging area?
To understand what is staging area is, let’s take a real-world example – suppose that you are moving to another place, and you have to pack your stuff into boxes and you wouldn’t want to mix the items meant for the bathroom, kitchen, bedroom, and the living room in the same box. So, you will take a box and start putting stuff into it, and if doesn’t make sense, you can also remove it before finally packing the box and labeling it.
Here, in this example, the box serves as the staging area, where you are doing the work (crafting your commit), whereas when you are done, then you are packing it and labeling it (committing the code).
In technical terms, the staging area is the middle ground between what you have done to your files (also known as the working directory) and what you had last committed (the HEAD commit). As the name implies, the staging area gives you space to prepare (stage) the changes that will be reflected on the next commit. This surely adds up some complexity to the process, but it also adds more flexibility to selectively prepare the commits as they can be modified several times in the staging area before committing.
Assume you’re working on two files, but only one is ready to commit. You don’t want to be forced to commit both files, but only the one that is ready. This is where Git’s staging area comes in handy. We place files in a staging area before committing what has been staged. Even the deletion of a file must be recorded in Git’s history, therefore deleted files must be staged before being committed.
What are git commands for the staging area?
git add
The command used to stage any change in Git is git add. The git add command adds a modification to the staging area from the working directory. It informs Git that you wish to include changes to a specific file in the next commit. However, git add has little effect on the repository—changes are not truly recorded until you execute git commit.
The common options available along with this command are as follows:
You can specify a <file> from which all changes will be staged. The syntax would be as follows:
git add <file>
Similarly, you can specify a <directory> for the next commit:
git add <directory>
You can also use a . to add all the changes from the present directory, such as the following:
git add .
git status
git status command is used to check the status of the files (untracked, modified, or deleted) in the present branch. It can be simply used as follows:
git status
git reset
In case, you have accidentally staged a file or directory and want to undo it or unstage it, then you can use git reset command. It can be used as follows:
git reset HEAD example.html
git rm
If you remove files, they will appear as deleted in git status, and you must use git add to stage them. Another option is to use the git rm command, which deletes and stages files in a single command:
To remove a file (and stage it)
git rm example.html
To remove a folder (and stage it)
git rm -r myfolder
git commit
The git commit command saves a snapshot of the current staged changes in the project. Committed snapshots are “secure” versions of a project that Git will never alter unless you specifically ask it to.
Git may be considered a timeline management utility at a high level. Commits are the fundamental building blocks of a Git project timeline. Commits may be thought of as snapshots or milestones along a Git project’s history. Commits are produced with the git commit command to record the current status of a project.
Git Snapshots are never committed to the remote repository. As the staging area serves as a wall between the working directory and the project history, each developer’s local repository serves as a wall between their contributions and the central repository.
The most common syntax followed to create a commit in git is as follows:
git commit -m "commit message"
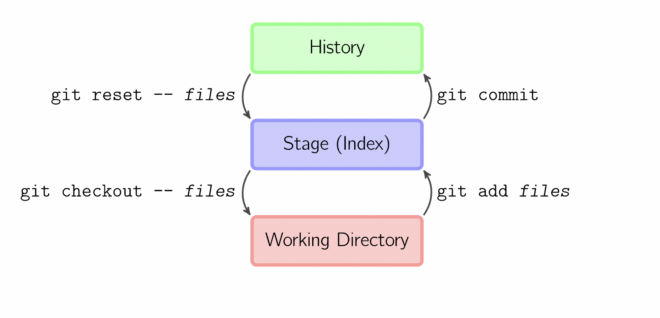
The above commands and their functionalities can be summed up simply in the following image:
Conclusion
To summarize, git add is the first command in a series of commands that instructs Git to “store” a snapshot of the current project state into the commit history. When used alone, git add moves pending changes from the working directory to the staging area. The git status command examines the repository’s current state and can be used to confirm a git add promotion. To undo a git add, use the git reset command. The git commit command is then used to add a snapshot of the staging directory to the commit history of the repository.
This is all for this article, we will discuss more Git Internals in the next article. Do let me know if you have any feedback or suggestions for this series.
If you want to read what we discussed in the earlier instalments of the series, you can find them below.
Git Internals Part 1- List of basic Concepts That Power your .git Directory here
Git Internals Part 2: How does Git store your data? here
Keep reading!
Recent Posts


August 27, 2025
How to Find the Right Learning Path When You’re Switching to a Tech Career
See post


August 27, 2025
The Hidden Challenges in Software Development Projects: Key Insights from Our Latest Survey
See post


August 22, 2025
Developer News This Week: AI Speed Trap, GitHub Copilot Agents, iOS 26 Beta Updates & More (Aug 22, 2025)
See post